Archive for the ‘tutorial’ Category

Tutorial on how to use JavaFX 1.3 with the Twitter API

June 7, 2010

I thought I would put together a basic tutorial, showing JavaFX in action with the Twitter API (utilising Twitter4J). The app will resolve your Twitter followers, show your timeline, and send a tweet.

In the first instance you need to download the latest Twitter4J library. I use NetBeans and so I added Twitter4J to the new project I created for this tutorial. Under the properties, right click, select properties, then select library. Then add the jar file you downloaded.

Ok, with that done, we can start coding. First off we want to create a Java class file, lets call it MyTwitterReader:

public class MyTwitterReader
{
    private Twitter myTwitter;
    private String timeLine;
    private String followersURL;
    private IDs myFollowerIds;

    public MyTwitterReader()
    {
        myTwitter = new Twitter("your Twitter username","your Twitter password");
    }

    public String getTimeline()
    {
        try
        {
            List myTimeline = myTwitter.getUserTimeline();
            for (Status status : myTimeline)
            {
                timeLine = timeLine + status.getText() + '\n';
            }

        }
        catch (Exception e)
        {
            System.err.println("Error! "+e.toString());
        }
        finally
        {
            return timeLine;
        }
    }

    public String getFollowersURLs()
    {
        followersURL = new String();
        try
        {
            myFollowerIds = myTwitter.getFollowersIDs();
            int[] t = myFollowerIds.getIDs();
            for (int i = 0; i < t.length; i++)
            {
                String id = String.valueOf(t[i]);
                User tu = myTwitter.showUser(id);
                followersURL = followersURL + tu.getProfileImageURL() + '\n';
            }
        }
        catch (Exception e)
        {
            System.err.println(&quot;Error! &quot;+e.toString());
        }

        finally
        {
            return followersURL;
        }
    }

    public void sendMessage(String tweet)
    {
        try
        {
            myTwitter.updateStatus(tweet);
        }
        catch(Exception e)
        {
            System.err.println("Error! Failed to send "+e.toString());
        }
    }

}

The first thing to note is we are hard-coding the username and password within the constructor, if you want you can write a new constructor which takes the username and password which have been provided by the UI (but that isn’t for this tutorial). I have also created two methods, getTimeline and getFollowersURLs. These will be used to populate the relevant lists in the UI. Further to this, there is the method sendMessage(tweet) which will be called when we want to Tweet to the rest of the world!

The Twitter object, myTwitter is used to gain access to the Twitter data. In the case of getTimeline, we call the getUserTimeline() method which returns a List of Status objects. I then go through each of these and write to a String object and pass this back (in our case JavaFX). The method getFollowersURLs() calls getFollowersIDs(), which returns an IDs object, I then put this into an array of int, and loop through each value converting the value to a String and passing this to showUser method. This method returns a Twitter User object, from which I can ascertain the Profile Image URL using the method getProfileImageURL() on each Twitter User object.

You still with me? Cool.

Let moves onto the “exciting” bit, the user interface. First things first, I am not a designer and this is a simple tutorial so bear with me on the “look and feel”, of course you can do what you want πŸ™‚

Ok, so the UI will contain the Timeline, your followers pictures, and a input box in which you can type your tweet, oh and a button to send the tweet, this is how I have laid it out:

Ok, so a quick overview of the UI.

  1. You will notice the Tweet button is “greyed” out, this will change once some data is entered.
  2. The Characters remaining will count down with each character we enter.
  3. Both My Followers and My Tweets are empty (well we haven’t coded it all up yet!)
  4. Do you like my choice of colours, very original!

I hope this is ok, now over to the code. In the first instance, I like to encapsulate this in a class rather than have it all in the Main.fx file. So we will create a JavaFX class instance, call it TwitterOverview, below is the code:

public class TwitterOverview extends CustomNode
{
    package var processTweet : function(s: String):Void;
    package var timeLine: String;
    package var followersURL: String;

    var tweet : String;
    var items : String[];
    var followerURLs: String[];

    var tweetInput : TextBox = TextBox
    {
       //styleClass: "twitterOverviewTweetInputText"
       columns: 40
       selectOnFocus: true
       translateY: 40;
       translateX: 120;
    }

    var tweetLength : Integer = bind (140 - tweet.length());

    def tweetButton : Button = Button
    {
       //styleClass: "twitterOverviewTweetButton"
       translateY: 38;
       translateX: 450;
       text: "Tweet";
       disable: bind if (tweetInput.rawText.length() < 140 and tweetInput.rawText.length() > 0) false else true;
       action: function()
       {
          processTweet(tweetInput.text);
          tweetInput.text = "";
          tweet = "";
       }
    }

    package var twitterPersonalTimelineLV : ListView = ListView
    {
       //styleClass: "TwitterOverviewTimeLine"
       translateX: 40;
       translateY: 120;
       layoutInfo: LayoutInfo
       {
          height: 450;
          width: 450;
       }
    }

    package var myFollowers : ListView = ListView
    {
       //styleClass: "TwitterOverviewMyFollowersList"
       translateX: 510;
       translateY: 90;
       layoutInfo: LayoutInfo
       {
          height: 350;
          width: 60;
          margin: Insets
          {
             top: 50
             bottom: 50
             left: 50
             right: 50
          }
       }
    }

    function setup():Void
    {
       items = timeLine.split('\n');
       followerURLs = followersURL.split('\n');

       if (twitterPersonalTimelineLV.items.size() > 0)
       {
          delete twitterPersonalTimelineLV.items;
       }

       for (i in [1..<items.size()])
       {
          insert items[i] into twitterPersonalTimelineLV.items;
       }

       if (myFollowers.items.size() == 0)
       {
          for (i in [0..<if (followerURLs.size() < 10) followerURLs.size() else 10])
          {
              insert
              ImageView
              {
                  fitHeight: 50;
                  fitWidth: 50;
                  image: Image { url: followerURLs[i];}
              }
              into myFollowers.items;
          }
       }
    }

    var screen2 : Group = Group
    {
       content:
       [
          Label
          {
             //styleClass: "TwitterOverviewMyTweets"
             text: "My tweets:"
             translateX: 40;
             translateY: 100;
          },
          twitterPersonalTimelineLV,
          Label
          {
             //styleClass: "TwitterOverviewMyFollowers"
             text: "My Followers:"
             translateX: 510;
             translateY: 70;
          },
          myFollowers,
          Label
          {
             //styleClass: "TwitterOverviewSendTweet"
             text: "Send a Tweet"
             translateX: 30;
             translateY: 40;
          },
          tweetInput,
          tweetButton,
          Label
          {
             //styleClass: "TwitterOverviewCharsRemaining";
             text: bind "Characters remainding {(140-tweetInput.text.length())}"
             translateX: 340;
             translateY: 70;
          }
       ]
    }

    override function create():Group
    {
       setup();
       return screen2
    }
 }

Ok, a few comments to make about this code:

  1. You will notice the commented lines styleClass – This is for the CSS styling. I won’t cover this here.
  2. If you look at the tweetButton code, you will see it is disabled = true if the text within the TextBox (tweetInput) is 0 or greater than 139. This means the button is enabled when you start typing.
  3. The same applies to the text counting down the number of characters, notice we are using rawText.length() to ascertain this.
  4. I hold my hands up to using X / Y positioning, rather than VBox, HBox etc, I know Amy Fowler won’t be happy! πŸ™‚ It was just what I did at the time, and I am being lazy by not changing it. Apologies!
  5. The only other thing worth commenting on is, I have the function to process sending a tweet in Main.fx (we shall move onto that next).

Now it gets exciting…. We move onto Main.fx. As we laid out the UI in the TwitterOverview class, the main.fx is clean and tidy (just the way I like it):


       var fxTwitter: MyTwitterReader = new MyTwitterReader();

       function processTweet(tweet: String):Void
       {
            fxTwitter.sendMessage(tweet);
       }

       var myTwitterOverview : TwitterOverview = TwitterOverview{processTweet: processTweet; followersURL: bind fxTwitter.getFollowersURLS(); timeLine: bind fxTwitter.getTimeline();};

       Stage 
       {
             title: "Application title"
             scene: Scene
             {
                    width: 600
                    height: 600
                    content: 
                    [
                          myTwitterOverview
                    ]
             }
       }

That’s it!!! Fire it up and send me a Tweet πŸ™‚ (@SmeeZee)

Going forward, you might want to play with CSS styling, or perhaps explore the additional functionality available through Twitter4J. Perhaps you want the Timeline to update every X seconds? Have a play, let me know what you do. Of course my style is evident in this code, if it goes against yours I am sure you can get my drift and can code up your own JavaFX Twitter client.

Ha fun.

Comparing Processing to JavaFX via a Processing tutorial

April 21, 2010

I came across this Processing tutorial via flowingdata the other day written by Jer Thorp (an artist and educator from Vancouver, Canada), I think it is a very impressive tutorial. It’s a nice and easy introduction to Processing with some excellent results.

It has played on my mind since because I “cut my teeth” learning Processing and now I have ventured off into the world of JavaFX. I thought it might be interesting to compare, for each step of the tutorial, the equivalent steps required in JavaFX.

So here goes, I will give an overview of each step Jer details with the Processing code and then give the equivalent JavaFX code. The end result should be two applications doing the same thing but different languages.

In the first instance I needed to setup the SimpleSpreadsheetManager class, this wasn’t too difficult, I downloaded Jer’s code and then created a new JavaFX project in Netbeans. I had to setup the Google Data libraries, and then type in the code.

With that out of the way I can progress, Jar’s first Processing task is to define the dimensions and the background colour:

In Processing:

void setup()
{
    size(800,800);
    background(0);
    smooth();
}

In JavaFX:

Stage
{
   scene: Scene
   {
      width: 800
      height: 800
      fill: Color.BLACK;
   }
}

His next step is to retrieve the data from the spreadsheet, using a function getNumbers(), his Processing code is:

    int[] numbers = getNumbers();

My JavaFX code is:

    var numbers : Integer[] = getNumbers();

With the function getNumbers() being:

Processing

int[] getNumbers()
{
    println("Asking Google for numbers...");
    sm = new SimpleSpreadsheetManager();
    sm.init("RandomNumbers", googleUser, googlePass);
    sm.fetchSheetByKey(sUrl, 0);

    int n = sm.currentListEntries.size();
    int[] returnArray = new int[n];
    for (int i = 0; i < n; i++) {
        returnArray[i] = int(sm.getCellValue("Number", i));
    };
    println("Got " + n + " numbers.");
    return(returnArray);
}

and for JavaFX:

function getNumbers():Integer[]
{
    println("Asking Google for number...");
    sm = new SimpleSpreadsheetManager("randomnumbers", googleUser, googlePass);
    sm.fetchSheetByKey(sUrl,0);

    var n = sm.currentListEntries.size();
    var res : Integer[] = [];
    for (i in [0..<n])
    {
       insert Integer.parseInt(sm.getCellValue("Number", i)) into res;
    }
    return res;
}

Notice I changed the SimpleSpreadsheetManager by creating a new constructor rather than using the init function (just a personnel preference).

With the data retrieved it is a case of creating the β€œWorld’s easiest data visualisation!”, the Processing code is:

 fill(255,40);
 noStroke();
 for (int i = 0; i < numbers.length; i++)
 {
     ellipse(numbers[i] * 8, width/2, 8, 8);
 }

And to do the same in JavaFX it is:

 Group
 {
     content: for (i in [0..<numbers.size()])
     {
        Circle
        {
            centerX: numbers[i] * 8;
            centerY: st.scene.width/2;
            radius: 8;
            fill: Color.WHITE;
            opacity: 0.4;
        }
     }
 }

Slightly more code, but all very straight forward and easy.

Worlds easiest visualisation

Next up, Jer wants to compare the random numbers he received from his <a href=”http://www.twitter.com”>Twitter</a&gt; followers to that of the random numbers generated by Processing by expanding the previous code with:

 for (int i = 0; i < numbers.length; i++)
 {
     ellipse(ceil(random(0,99)) * 8, height / 2 + 20, 8, 8);
 }

JavaFX code is:

 Group
 {
    content:
    [
       for (i in [0..<numbers.size()])
       {
          Group
          {
             content:
             [
                Circle
                {
                    centerX: numbers[i] * 8;
                    centerY: bind st.scene.width/2;
                    radius: 8;
                    fill: Color.WHITE;
                    opacity: 0.4;
                },
                Circle
                {
                    centerX: Math.ceil((Math.random()*100)*8);
                    centerY: bind st.scene.width/2 + 40;
                    radius: 8;
                    fill: Color.WHITE;
                    opacity: 0.4;
                }
             ]
          }
       }
    ]
 }

Worlds easiest visualisation comparison

BarGraph

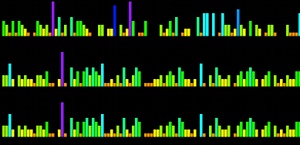
Jer now wants to produce a histogram, or bar graph, of the random number distribution. The Processing code for this is:

void barGraph(int[] nums, float y)
{
   //Make a list of number counts
   int[] counts = new int[100];
   //Fill it with zeros
   for (int i = 1; i < 100; i++)
   {
      counts[i] = 0;
   }
   //Tally the counts
   for (int i = 0; i < nums.length; i++)
   {
      counts[nums[i]] ++;
   }
   //Draw the bar graph
   for (int i = 0; i < counts.length; i++)
   {
      rect(i * 8, y, 8, -counts[i] * 10);
   }
}

And in JavaFX the same function looks like:

function barGraph(nums:Integer[], y: Float):Group
{
   var counts : Integer[] = [];

   for (i in [0..<100])
   {
      insert 0 into counts;
   }

   for (i in [0..<nums.size()])
   {
      counts[nums[i]]++;
   }

   return Group
   {
      content:
      [
          for (i in [0..<counts.size()])
          {
             Rectangle
             {
                x: i * 8;
                y: y - ((counts[i]) * 10);
                width: 8
                height: (counts[i]) * 10;
                fill: Color.WHITE;
                strokeWidth: 1.0
                stroke: Color.BLACK;
             }
          }
      ]
   }
}

Notice the slight difference in handling the direction of the rectangles, Processing relies on a negative height, and JavaFX subtracts a value from the value for y.

Next up Jer introduces colour to his bar chart by updating the final loop to be:

   for (int i = 0; i < counts.length; i++)
   {
      colorMode(HSB);
      fill(counts[i] * 30, 255, 255);
      rect(i * 8, y, 8, -counts[i] * 10);
   }

And JavaFx it is:

   for (i in [0..<counts.size()])
   {
       Rectangle
       {
           x: i * 8;
           y: y - ((counts[i]) * 10);
           width: 8
           height: (counts[i]) * 10;
           fill: Color.hsb((counts[i] * 30), 1.0, 1.0);
           strokeWidth: 1.0
           stroke: Color.BLACK;
       }
   }

Interestingly, you get different shades between the two! This, I presume, is down to how ColourMode(HSB) and Color.hsb differ, I openly admit to not being completely aware of the workings of these.

A final extension to this work, is comparing the histogram of the human generated random numbers to the system generated values, Jer’s Processing code:

int[] numbers = getNumbers();
//Draw the graph
barGraph(numbers, 100);

for (int i = 1; i < 7; i++)
{
   int[] randoms = getRandomNumbers(225);
   barGraph(randoms, 100 + (i * 130));
}

JavaFX code is:

   barGraph(numbers,100),
   for (i in [1..<7])
   {
      randoms = getRandomNumbers(255);
      barGraph(randoms, 100 + (i * 130))
   }

histogram comparison

Boxes and Numbers

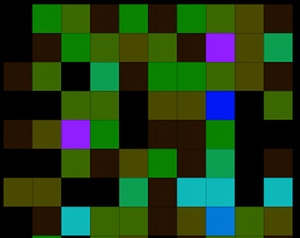
Now we are finished with histograms and Jer moves us onto to a new visualisation technique, boxes. I quite like this, it is amazingly simple to code in Processing and looks really good. So the Processing code is:

void colorGrid(int[] nums, float x, float y, float s)
{
 //Make a list of number counts
 int[] counts = new int[100];
 //Fill it with zeros
 for (int i = 0; i < 100; i++)
 {
    counts[i] = 0;
 }
 //Tally the counts
 for (int i = 0; i < nums.length; i++)
 {
    counts[nums[i]] ++;
 }

 pushMatrix();
 translate(x,y);
 //Draw the grid
 for (int i = 0; i < counts.length; i++)
 {
    colorMode(HSB);
    fill(counts[i] * 30, 255, 255, counts[i] * 30);
    rect((i % 10) * s, floor(i/10) * s, s, s);
 }
 popMatrix();
}

And now the same code in JavaFX:

function colourGrid(nums:Integer[], x: Float, y:Float, s: Float):Group
{
   var counts : Integer[] = [];
   var maxValue = -1;

   for (i in [0..<100])
   {
      insert 0 into counts;
   }

   for (i in [0..<nums.size()])
   {
      counts[nums[i]]++;
      if (counts[nums[i]] > maxValue) maxValue = counts[nums[i]];
   }

   return Group
   {
     content:
     [
         for (i in [0..<counts.size()])
         {
             Rectangle
             {
                 x: (i mod 10) * s + 25;
                 y: Math.floor(i/10) * s + 25;
                 width: s
                 height: s
                 fill: Color.hsb(counts[i] * 30, 1.0, 1.0);
                 stroke: Color.BLACK;
                 strokeWidth: 0.5;
                 opacity: ((counts[i] as Number)/(maxValue as Number)) as Number
             }
         }
     ]
   }
}

Some interesting differences here, Processing handles the colouring differently and so I have calculated the opacity based on the ratio of the value to the maximum count. Again the colours are slightly different, but it still looks good.

boxes visualisation of random numbers

Finally Jer changes the boxes to the numbers, but maps the colours and opacity relevant to the frequency of the value, again quite simple but really nice. Processing code:

void colorGrid(int[] nums, float x, float y, float s)
{
 //Make a list of number counts
 int[] counts = new int[100];
 //Fill it with zeros
 for (int i = 0; i < 100; i++)
 {
    counts[i] = 0;
 }
 //Tally the counts
 for (int i = 0; i < nums.length; i++)
 {
    counts[nums[i]] ++;
 }

 pushMatrix();
 translate(x,y);
 //Draw the grid
 for (int i = 0; i < counts.length; i++)
 {
    colorMode(HSB);
    fill(counts[i] * 30, 255, 255, counts[i] * 30);
    textAlign(CENTER);
    textFont(label);
    textSize(s/2);
    text(i, (i % 10) * s, floor(i/10) * s);
 }
 popMatrix();
}

And JavaFX

function colourGrid(nums:Integer[], x: Float, y:Float, s: Float):Group
{
   var counts : Integer[] = [];
   var maxValue = -1;

   for (i in [0..<100])
   {
      insert 0 into counts;
   }

   for (i in [0..<nums.size()])
   {
      counts[nums[i]]++;
      if (counts[nums[i]] > maxValue) maxValue = counts[nums[i]];
   }

   return Group
   {
      content:
      [

         for (i in [0..<counts.size()])
         {
             Text
             {
                x: (i mod 10) * s + 50;
                y: Math.floor(i/10) * s + 75;
                content: counts[i].toString();
                opacity: ((counts[i] as Number)/(maxValue as Number)) as Number
                font: Font.font("Helvetic", FontWeight.REGULAR, s);
                textAlignment: TextAlignment.CENTER;
                fill: Color.hsb(counts[i] * 30, 1.0, 1.0);
             }
         }
      ]
   }
}

Random numbers

So that is it. I really like Jer’s tutorial, and the results. It is amazing how simple it is but you feel like you have achieved a lot. Converting the tutorial from Processing to JavaFX was quite straight forward, with no major surprises or problems.

If anyone wants the JavaFX code I would be happy to share? Thanks again to Jer for sharing his tutorial.